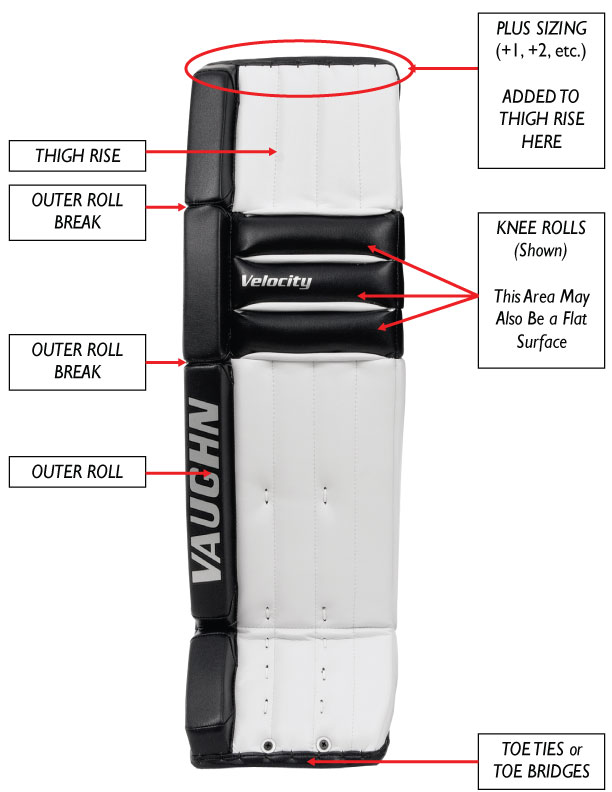
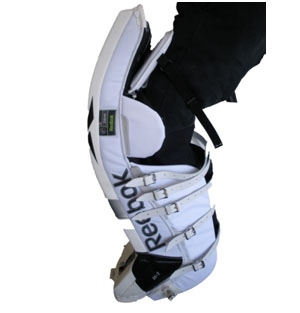
Before you begin the fitting and buying process, it’s important to determine the style of play that the goaltender prefers.  Typically, today's styles fall under one of two categories – “Reaction/Hybrid” style or “Blocking/Butterfly” style.  Each style’s attributes, along with a list of pad options that will work for that style, are listed below.

“Reaction” or “Hybrid” – typically denotes a goalie relies on quick, agile reaction saves (i.e Tim Thomas), likes to have the ability to skate/move freely to make saves, prefers to catch, trap or cover most shots to the body, and prefers pad rebounds that stay close to the pad upon impact.

These goalies typically prefer leg pads with:

· breaks both above and below the knee

· a tapered boot and/or offset boot channel

· knee rolls (sometimes)

· “softer” feel – typically denotes a pad stuffed with both rigid and shredded foams to help deaden rebounds.  


“Blocking” (formerly “Butterfly”) Style – moves less around the crease and relies on positioning, patience and size to make save; moves laterally on his/her knees often; attempts to block or deflect most pucks instead of catch and control; and prefers pad rebounds that shoot far away from the front of the net.

These goalies typically prefer leg pads with:

· Pads with either one break below the knee or no breaks at all.

· Squared off boot section of pads

· Flat faced fronts (no knee rolls) for more directional rebound control

· “harder” feel – pads stuffed with mostly rigid foams that propel rebounds away from the net


Leg Pad Anatomy

Comparing leg pads is easier once you know the names, locations, and functions of the pad parts being described.  The chart below details the anatomy of a leg pad, and it also describes each part's function as well.

Pad Face (from the top of the pad down to the bottom):
 

Outer Roll – stuffed roll on the outside edges of the goalie pad.  These help prevent the puck from hitting the top of the pad and “skipping over” it into the net.  Pad breaks are located here, which help determine the flexibility of the pad

· Pads with 0 breaks in the outer roll are typically more rigid

à Good for goalies with a wide butterfly (flexible goalies with the ability to flare their legs further out to the sides in a butterfly position) who don’t need a flexible pad to close the five hole

· Pads with 1-2 breaks are easier to flex around the knee area

à “Single Break” pads have one break below the knee area

· Good for goalies with a moderately wide butterfly who need a little flexibility in the pad to close the five hole

à “Double Break” pads have one break below and one break above the knee area

· Good for goalies with a more narrow butterfly who need a flexible pad to close the five hole In a butterfly position.

Thigh Rise – face of pad that extends above the knee rolls or knee area.

· Most pads these days come in +1” sizing, meaning that an extra inch has been added to the top of the pad to help increase 5-hole coverage in the butterfly position.  Newer pads are even going to a +2 standard sizing in their larger models (35” & 36” pads)

Knee Rolls or Knee Area:

Knee Rolls – typically 3 of these, allow for more flexibility in the pad through the knee area.  Their composition Includes:

· Shredded foam – more rounded in shape, these rolls help deaden the puck upon impact.

OR

· Rigid Strips of High Density Foam – more flat in shape, these allow for more predictable rebounds off of the knee area.

“Flat” Knee Area (no rolls) – one sheet of flat, HD foam keeps knee area more rigid and allows for more predictable rebound direction. 

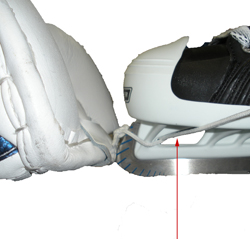
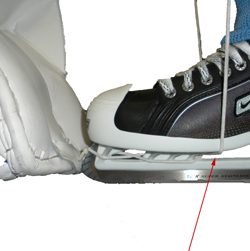
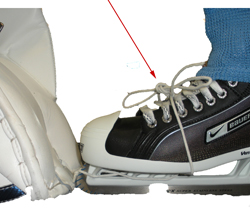
Toe Tie/Sliding Toe Bridge – both function to keep the goalie skate attached to the bottom of the pad, though they work in different ways

· Toe Ties – allow the goalie to snug the bottom center of the pad close to the front of the skate.  This helps “center” the pad back to its original position after making a butterfly type save.

· Sliding Toe Bridges – function to keep the toe of the skate close to the bottom of the pad, but allow for movement of the skate along the bridge channel.  This movement puts less stress on the goalie’s ankles while in the butterfly position.


Pad Interior (from the top, down): 


Thigh Guard – additional piece of protection that attaches to the goalie’s knee/thigh for extra protection.  These typically lace into tabs above the knee lock, and they are removable if desired.

· Function to provide protection and padding as the goalie lands on his/her knees in the butterfly position.

Knee Lock – sheets of foam padding on either side of the knee area.  Together with an attached Velcro strap, it functions to hold the goalie’s knee to the pad so as to keep it in the proper position.

“Landing Gear” / Knee Stacks – found on the inside of the pad adjacent to the inside edge of the knee lock.  These pads can come in “stacks” (sheets of foam and nylon laced together) or “blocks” (larger blocks of foam, or one pocket with several sheets of foam).

· Oftentimes, knee stacks can be added or subtracted to a pad that has them.

Leg Channel – refers to the channel on the inside of the pad that runs from the knee lock to the ankle area.  They vary by width and depth according to the style of pad

· Deep, narrow leg channels are oftentimes found in “Hybrid” style pads, as they are helpful in keeping the pad closer to the leg and therefore more centered on the leg while moving. 

· Shallow, wide leg channels are often found on “Butterfly” or “Blocking” style pads as they allow the pad to rotate to a perpendicular position to the ice more easily in a butterfly position.

Calf Lock (not on all pad models) – sheets of foam padding located on each side of the leg channel in the calf area, often accompanied by a Velcro strap that stretches from one pad to another over the goalie’s calf.  They function to both protect the calf area and lock the goalie’s shin into the pad, allowing him/her to wear the calf straps attached to the pad more loosely.

Boot Channel – the area of the pad that sits on top of the goalie’s skates.  Like Leg Channels, boot channels can vary by depth and width for the same reasons that leg channels do (see “Leg Channel descriptions above).

Medial Edge – refers to the inside edge of the goal pad that comes in contact with the ice in a butterfly position.


Properly Fitting Leg Pads

The most important consideration in sizing leg pads is to make sure that the goalie's knee fits securely in the "knee cradle" or "knee lock" of the pad.  This part of the pad generally has a velcro strap that runs between two sheets of foam (one on each side of the knee), and it is flanked on the inside by one or two foam pads that protect the goalie's knee when he/she goes down into the butterfly position on the ice.

Due to the number of times that a goalie will go down on his/her knees during a game or practice, it is imperative that leg pads fit properly in this regard.  Pads that are too big or too small will cause the goalie's knees to miss these inside pads (often called "knee stacks" or "knee risers") and land directly on the ice.  Just one instance of knee to ice contact while dropping to a butterfly position can lead to injury.

To select a size, bend your leg slightly and measure the length of your shin from the center of your kneecap to your ankle. Next, measure the length from the center of your kneecap to your mid-thigh. Add these two measures together along with your skate size and you should have a good idea of what size leg pad to purchase. 

Ankle to Knee Pad Measurement Example
Skate Size Ankle to Knee (in.) Knee to Thigh (in.) Approx. Pad Size
10 18" 7" 35 +1

A perfectly fit pad will find the goalie's knee sitting in the center of the knee cradle, adjacent to the knee risers for maximum protection.  To accommodate "Growing Room", we recommend that the center of the goalie's knee be no lower than 1inch from the center of the knee cradle and the inside of the knee must be able to contact the knee risers.  To determine if the pad fits properly, strap it to your leg while wearing skates and see where your knee lands in the cradle.
 

The +1 sizing system is standard for leg pads, meaning that “+1” is an extra inch added to the top of the leg pad. This addition helps goalies with their butterfly position as well as with their five-hole coverage.  Some goal pads come with a +2” sizing system, which is more common with high level, experienced goalies.

NOTE:  Some manufacturers recommend using a "Floor to Knee" measurement sizing formula for their leg pads.  This process involves measuring the distance from the floor to the center of the knee cap in a sitting position, and then comparing this measurement to their size chart to determine pad size.  Consult the "Sizing" tab on our leg pad product pages when choosing leg pads, as this will tell you the correct which formula to use.

Please note the goalie's stance in the picture (below right) representing how the knee should be aligned with knee cradle.
 

How to put on goalie leg pads

Once you have determined the appropriate pad size, the next step is to attach them to your leg to check the fit.  To be fit properly, it is important to try the pads on with both pants and goalie skates, as these will insure that you get the most accurate fit possible

First, know that the straps are meant to be worn loose, especially on the top half of the pad. With the exception of the knee cradle and calf wrap strap (if your pads have them), it is important for the straps to be worn loosely. Otherwise, you will not be able to butterfly properly. The leg pad needs to fit loose enough on the leg, so that it can rotate when going down to the ice to butterfly.

Step #1 - attach the toe ties to the pad (see below)

Step #2 - run the boot strap through the back hole of the skate cowling, keeping the strap approximately 1-2 holes outside of snug.

Step #3 - If the pad has a calf wrap strap, attach this to your desired level of tightness.   Attach the Calf straps from the top of the boot to the bottom of the knee  approximately 2-3 strap holes outside of snug

Step #4 - Attach the Knee and/or Thigh Straps.  These can be worn the loosest of all of the straps, and we recommend attaching them at approximately 4-5 holes from snug as a starting point.

Step #5 - if the pads come with attached Knee/Thigh Protectors, tighten the straps around the knee and thigh and tuck the pad underneath your pant leg.


Toe Ties:
These are the strings at the toes of the pad and they are meant to keep the skate and pad in sync. First, make a ¾” to 1” knot from the toe bridge of the pad like the image to the right.

This allows you to tie the laces tight and still allows the pad to shift enough when using inside edges for lateral movement. Without this knot, the pad will be too snug and may grip the ice instead of the skate blade, causing the foot to slip out from underneath.

Lacing Toe Ties: There are multiple ways to lace toe-ties. The pictures below depict the most common and easiest tying method. Align the toe of the pad to the toe of the goalie skate. Take both laces and loop them through the first hole on the bottom of the skate near the toe; do the same through the second middle hole; finally, bring the laces up over the top of the skate and tie tightly.


Step 1
Align the knot of the toe tie to the toe of the skate. Take one lace to the right side of the skate and the other to the left; then loop both through the first hole of the skate holder.


Step 2
Pull tightly and repeat Step 1 through the second hole of the skate holder.


Step 3
Pull tightly and bring both laces to the top of the skate and tie.

Leg pads are classified into four different size ranges and, for the most part, these size ranges accommodate the ages listed below.  Note that, the smaller the leg pad, the narrower the pad is.  Goalies moving from a Junior to an Intermediate pad will want to pay careful attention to the pad with as both size categories make 10 inch pads. 

Leg Pad Sizing Guide
Size: YOUTH JUNIOR INTERMEDIATE SENIOR
Age Range: 4 - 6 6 - 10 11 - 13 14 to Adult
Pad Size: 22" - 24" 25" - 30" 26" - 31" 32" - 38"
Pad Width: 8.5" - 9" 9.5" - 10" 10" - 10.5" 11"